|
||
| Table of Contents | ||
|
||
| What is this advanced guide? | ||
|
This advanced guide is an extension to the manual, it covers gameplay techniques that aren't obvious to new players. As time goes, the skill gap between the "veterans" and the new players widens, this guide aims to give new players some knowledge about the game to reduce this gap. This guide is not a replacement to the classic manual: if you do not know how to capture scientists, vote, or destroy equipment, you should read the manual first. Not all the information listed here is essential, you can definitely have fun in the game without knowing any of this. But if you'd like to get better, have a more complete understanding of the game, this guide can be helpful. |
||
| Team Organization | ||
|
In S&I the main objective is to have more scientists than your opponents. This objective divides into 2 jobs:
How to decide what to do? There are 6 scientists in the game. A good company should focus on defending or attacking depending on the number of scientists it has. Typically if you have more than 3 scientists, your company should have more defense than offense. If you have less than 3 scientists, more offense and less defense, and if you have 3 scientists, about as much offense as defense. So try to be careful to the number of scientists your company has and to what your teammates are doing, so you know if your company needs a guard or a recruiter. |
||
| Communication & Awareness | ||
|
Being aware of what's going on in the game is essential in S&I. Are we missing a scientist? Is a teammate coming back with a scientist? If so, where is he? Was a scientist dropped? This is the kind of information you want to know about. The HUD helps a lot in knowing what's going on, especially these 2 HUD elements:
|
||
| Research Strategy | ||
|
First, make sure to know how the techtree works. A good research strategy is fundamental to any company. While the different research options try to be balanced and viable, it is obvious that some strategies are simply better than others. Basically going only 1 way will not work: trying to get all the weapons first won't work, same for getting all the armor and all the implants but no weapon. You need a mix between the different types of research: weapons, armor, implants, devices and process upgrades. It is usually advised to get the 2 first levels of armor early in the game, since it is very difficult to survive any fight without armor. Then your strategy should adapt to your situation: if you are winning, going for the satchels and tripmines is a wise decision, as these technologies will greatly help you defend your scientists. If you are losing however, the leg upgrades and Tau Canon are more likely to help you capture scientists. But be creative, the techtree allows a lot of freedom. The research route you are used to is not necessarily the most efficient for every situation. |
||
| Weapons | ||
|
This is a list of the weapons available in the game, explaining their primary and secondary modes.
Briefcase
Colt Defender
Assault Shotgun
Tommygun
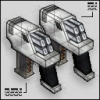
Akimbo snUZIs
Grenade
Flesh Eating Virus
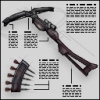 Primary fire: very powerful hitscan weapon. The crossbow is perfectly accurate and deals a high amount of damage. If you do not hit a player, the bolt explodes on impact. Unlike the Shotgun or the Rocket Pistol, it is not possible to switch weapon right away after firing.
Secondary fire: switches to zoom mode.
Rocket Pistol
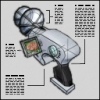
Tau Cannon
|
||
| Devices | ||
|
This is a list of the devices available in the game, explaining their primary and secondary modes.
Radio Transistor
Cloak
Mindray
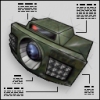
EMP Cannon
GI-Destabilizer
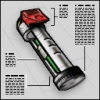
Satchels
Tripmines
|
||
| Super Jump | ||
|
The Super Jump research enables you to perform longer and higher jumps. To perform this special jump, all you have to do is hold forward when jumping, but without holding any other movement key. The Super Jump gives you a boost in the direction you are facing. If you want to jump higher, simply look up, hold forward, and jump. If you want to jump longer, look forward, hold forward and jump. The boost is increased once you have researched Cybernetic Leg Implants (MkII). It is impossible to perform a Super Jump when carrying a scientist or a resource. The Super Jump allows you to move more easily in the world, access higher places, jump above obstacles. It can also be used in fights to confuse the enemy, or dodge a rocket, you can even jump above an enemy and try to surprise him from above if you get good with the Super Jump. |
||
| Wall Super Jump | ||
|
The Super Jump research also enables you to perform jumps off walls. This is done the exact same way you perform a Super Jump, except that you need something solid behind you. Try it by Super Jumping towards a wall, looking in the other direction, and performing another Super Jump when reaching the wall. Read the part about the Super Jump if you don't know how to perform a Super Jump. |
||
| Tau Jumping | ||
|
One of the most fun movements in S&I is probably Tau Jumping. If you have played with the Tau Cannon, then you have noticed its big kickback. When you use the secondary fire, the longer you charge the Tau, the more kickback you get when you fire. This can be disorienting, but it can also be very useful: you can use this kickback to perform huge jumps. Simply charge the Tau, point it at the opposite of where you want to go (for example aim at the ground if you want to jump high in the air), perform a normal jump, and quickly release the charge to fire. This feature of the Tau Cannon is extremely helpful: it can make you jump very high, and it can also make you jump forward and that enables you to move a LOT faster. However it takes quite a bit of time to get really good at Tau Jumping. Also note that the Tau kickback is reduced when you are carrying a scientist. |
||
| Explosive Jumping | ||
|
The push you get from explosions can be used to perform special jumps. While all explosives can be used, most of them will hurt you too much to consider using them (satchels, grenades, tripmines). But the Crossbow primary fire, and occasionally the Rocket Pistol can be very useful. Just fire at the ground and jump right away. Explosive pushes are twice as powerful when you are ducked. So to get full advantage of an explosive, you should jump first, and then crouch jump on the ground while firing with your explosive weapon at the ground. But don't abuse explosive jumping since it hurts quite a bit. And unlike the kickback of the Tau, explosion pushes are not reduced when you are carrying a scientist. |
||
| EMP Jumping | ||
|
The EMP Cannon primary fire provides a very little push similar to an explosion. This push is not powerful enough to enable a regular explosive jump, but since the rate of fire of the EMP is high, it can be used to "climb" a wall. Just face a wall, aim at about 45 degrees down, jump, duck and start shooting. You will quickly climb the wall. You can also note that unlike explosives, this technique doesn't hurt you at all. And the push is not reduced when you carry a scientist. |
||
| Air Control | ||
|
When you are in the air, after a Tau Jump for example, it is possible to control where you are going. You are not forced to go straight, you can change direction in air. In order to control the direction, there are some tips to follow:
|
||
| Bunny Jumping | ||
|
Bunny Jumping is a movement technique that allows you to increase your speed. It is done by constantly jumping while releasing the forward key, and performing a special mouse and strafe movement.
The technique: bunny jumping is based on Air Control. You have to master air control before being able to bunny jump. Once you do, bunny jumping is easy: all you have to do is keep jumping and perform air control movements. A bunny jumping sequence can look like this: go forward, jump, release forward, turn left and strafe left, jump, turn right and strafe right, jump, turn left and strafe left, jump... You don't have to go left-right-left-right, this just allows to go straight, but if you keep going left for example, it works too. Just remember to keep jumping: as soon as you land you should be jumping right away. You can just start pressing jump when in the air so you are sure to jump right away when you touch the ground.
|
||
| Strafe Jumping | ||
|
Strafe Jumping is a movement technique very similar to Bunny Jumping. This technique allows you to get speed faster than when bunny jumping, however you can not turn in the air when performing it. That's why the best move is to combine both Strafe Jumping and Bunny Jumping.
The technique: the jumping is the same as in bunny jumping - you have to keep jumping. It's the movement performed in the air that is different, and this movement is not easy to explain. First, here you have to keep holding your forward key. Since you hold forward, you don't have much air control, that's why you can only go almost perfectly straight when strafe jumping.
|
||
| Crouch Sliding | ||
|
When you crouch after a jump, you slide on the ground for a limited period of time. This is called Crouch Sliding. Crouch Sliding allows you to keep your speed while going up short stairs, or going through vents, or anywhere where the ceiling is low. If you release +forward while crouch sliding, you have some control on your direction, exactly like the air control you have while bunny jumping. |
||
| Limitations | ||
|
While bunny jumping and strafe jumping allow to go faster, the speed increase can be limited. Each time you touch the ground and perform a jump, your speed can be more or less reduced. The speed limit evolves depending on what Cybernetic Leg Implant your company has researched. Without any, the limit is around 40%, with Cybernetic Legs MkI, the limit is around a 100% increase, and finally with Cybernetic Legs MkII, there is no limit. But when you are carrying a scientist or a resource, the limit is always set at 40% no matter what Cybernetic Leg Implant you have. |
||
| Game Modes | ||
|
Servers can decide to use special game modes that differ from the standard Science & Industry gameplay. These game modes are enabled by using the command mode [modename]. The command runs the config file si/gamemodes/[modename].cfg. If a server uses a special game mode, the name of the game mode appears in the 'Game' column of Steam's server browser. Default game modes included with the game are:
|
||
| Command Voting | ||
|
It is possible to start a command vote on a server to change the level, kick a player, start a match, change a setting... The server decides which commands can be voted for and which can not. The following line has to be typed in the console to start a vote: callvote [command] [parameter]. So, for example: "callvote changelevel si_laser" would start a vote to change the level to si_laser. Once a callvote is started, players vote with the yes or no commands (available in the Controls). If enough "yes" votes are recorded, the vote succeeds and the voted command is applied. |
||
| Client Settings | ||
|
Having a good config that suits your style of play helps a lot. Something very useful is direct weapon binds. They are available in the "Options", in the "Controls" tab, and they allow you to access any weapon with a single key press instead of having to go through the weapon menu. Try to bind the weapons you use the most, this will simplify the game.
There are also a lot of client variables allowing you to tweak your HUD, special effects and more. A list of all the cvars is available, and most settings can easily be changed in-game using the Commandmenu, or the "Advanced..." screen in the "Multiplayer" tab of the "Options" menu.
Weapon slots, positions and weights can also be changed, but there's no in-game menu for that. You'll have to edit your si/weapons.cfg file if you want to use custom weapon settings. |
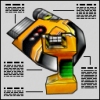
 Primary fire: the only melee weapon in the game. Not very powerful at first, it becomes deadly (x2 damage) once your company has researched the Bionic Muscle Fiber Replacements. Note that headshots do work with the briefcase. The briefcase is also used to grab enemy scientists.
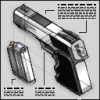 Primary fire: this pistol is perfectly accurate and deals 40 damage per shot (48 damage with the Ocular Implants). This weapon will kill an enemy in 3 shots at the start of the game.
 Primary fire: usual shotgun shot with an average spread, useful at close and medium range.
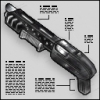
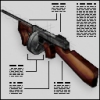 Primary fire: this machine gun deals a good amount of damage and is quite accurate. Especially useful at medium range, or at any range to finish an enemy who has low health.
 This weapon is MCL's version of AFD's Tommygun, it behaves exactly like the Tommygun.
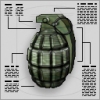 Primary fire: throws a grenade in front of you. The grenade has a 3 second fuse. This fuse begins the moment the pin is pulled. You can hold primary fire and release the grenade at the right time to get it to explode right on the enemy. This is quite difficult and requires practice.
 Primary fire: throws a vial of virus. The virus deals damage over time and affects the player's view. Any enemy touching the cloud created by the vial will be contaminated. The longer the player is in contact with the cloud, the more badly he'll be infected.
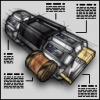
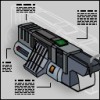
 Primary fire: launches a rocket. It is quite difficult to hit someone directly, that's why you should try to aim at the feet, letting the explosion radius damage do its job. It is recommended to switch to another weapon right after firing to avoid the firing rate delay.
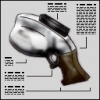
 Primary fire: works with a charge - the longer you charge (hold down the fire), the more damage the shot will deal. Fully charged, this is the most powerful weapon in the game. It is also perfectly accurate and can go through small walls, resulting in a powerful splash damage on the other side.
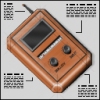 Primary fire: if enemy scientists are near, primary fire will plant the radio on the wall you are facing. Radios distract nearby enemy scientists and therefore reduce their efficiency. Try to plant them where they will be hard to find, while remaining close to the scientists.
 Primary fire: this device makes you invisible. Fire once to turn it on, and fire again to turn it off. When it is on, the more you move, the more visible you get, that's why you should barely move when using it, or move step by step slowly. This primary mode is more useful on defense than on attack.
 Primary fire: the Mindray works only on scientists. Use it on your scientists to increase their efficiency (making your company earn more money and research faster), and use it on the enemy scientists to reduce their efficiency. Mindraying enemy scientists isn't very useful (since you could disturb them by firing with any other weapon as well), but mindraying your own scientists can give your company a clear advantage in close games. The mindray also heals your scientists.
 Primary fire: launches a pulse. If the pulse hits the enemy, his armor will be highly reduced, he will be slower for a short period of time if he has Leg Upgrades, he will get a white flash if he has the Ocular Implants, he will get uncloaked if he is cloaked, and his extra melee damage will be disabled if he has Bionic Muscle Fiber Replacements. This mode is difficult to use since it isn't hitscan, but its high rate of fire can compensate. Remember you can not kill anyone with this device, it can be used first in a fight to affect the enemy and reduce his armor, but you have to switch to another weapon to finish him.
 Primary fire: infects nearby enemies. The infected players will have reduced speed and their view will be altered for a little bit of time. This device is effective on both defense and offense, but be careful: the effect wears off quickly.
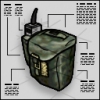 Primary fire: if you have already thrown satchels, it will trigger them to explode. Otherwise it will throw a satchel down. Satchels are extremely powerful on defense, and can be used occasionally on attack.
 Primary fire: plants the tripmine on the wall you're facing. Try to plant 2 tripmines at a time, in corners, or vents, and generally in places where the enemy won't see them until the last second.